-
[김영한 스프링] 54. 스프링 타입 컨버터 - 포맷터 적용하기 & 스프링이 제공하는 기본 포맷터Spring/스프링 MVC 2편 - 백엔드 웹 개발 활용 기술 2023. 10. 11. 23:44
포맷터 적용하기
포맷터를 웹 애플리케이션에 적용해 보자.
WebConfig - 수정
package hello.typeconverter;

import hello.typeconverter.converter.IntegerToStringConverter;
import hello.typeconverter.converter.IpPortStringConverter;
import hello.typeconverter.converter.StringToIntegerConverter;
import hello.typeconverter.converter.StringToIpPortConverter;
import hello.typeconverter.formatter.MyNumberFormatter;
import org.springframework.context.annotation.Configuration;
import org.springframework.format.FormatterRegistry;
import org.springframework.web.servlet.config.annotation.WebMvcConfigurer;

@Configuration
public class WebConfig implements WebMvcConfigurer {

    @Override
    public void addFormatters(FormatterRegistry registry) {
        // 주석처리 우선순위
//        registry.addConverter(new StringToIntegerConverter());
//        registry.addConverter(new IntegerToStringConverter());
        registry.addConverter(new StringToIpPortConverter());
        registry.addConverter(new IpPortStringConverter());

        // 추가
        registry.addFormatter(new MyNumberFormatter());
    }
}
주의 StringToIntegerConverter, IntegerToStringConverter를 꼭 주석처리 하자.
MyNumberFormatter도 숫자 -> 문자, 문자 -> 숫자로 변경하기 때문에 둘의 기능이 겹친다. 우선순위는 컨버터가 우선하므로 포맷터가 적용되지 않고, 컨버터가 적용된다.
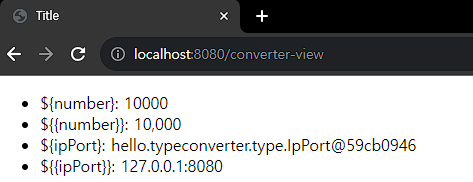
실행 - 객체 -> 문자

컨버전 서비스를 적용한 결과 MyNumberFormatter가 적용되어서 10,000 문자가 출력된 것을 확인할 수 있다.
실행 - 문자 -> 객체

로그

"10,000"이라는 포맷팅 된 문자가 Integer 타입의 숫자 10000으로 정상 변환 된 것을 확인할 수 있다.
스프링이 제공하는 기본 포맷터
스프링은 자바에서 기본으로 제공하는 타입들에 대해 수많은 포맷터를 기본으로 제공한다.
IDE에서 Formatter 인터페이스의 구현 클래스를 찾아보면 수많은 날짜나 시간 관련 포맷터가 제공되는 것을 확인할 수 있다.
그런데 포맷터는 기본 형식이 지정되어 있기 때문에, 객체의 각 필드마다 다른 형식으로 포맷을 지정하기는 어렵다.
스프링은 이런 문제를 해결하기 위해 애노테이션 기반으로 원하는 형식을 지정해서 사용할 수 있는 매우 유용한 포맷터 두 가지를 기본으로 제공한다.
- @NumberFormat : 숫자 관련 형식 지정 포맷터 사용, NumberFormatAnnotationFormatterFactory
- @DateTimeFormat : 날짜 관련 형식 지정 포맷터 사용, Jsr310DateTimeFormatAnnotationFormatterFactory
FormatterController

main/java/hello/typeconverter/controller/FormatterController 생성
package hello.typeconverter.controller;

import lombok.Data;
import org.springframework.format.annotation.DateTimeFormat;
import org.springframework.format.annotation.NumberFormat;
import org.springframework.stereotype.Controller;
import org.springframework.ui.Model;
import org.springframework.web.bind.annotation.GetMapping;
import org.springframework.web.bind.annotation.ModelAttribute;
import org.springframework.web.bind.annotation.PostMapping;

import java.time.LocalDateTime;

@Controller
public class FormatterController {

    @GetMapping("/formatter/edit")
    public String formatterForm(Model model) {

        Form form = new Form();
        form.setNumber(10000);
        form.setLocalDateTime(LocalDateTime.now());
        model.addAttribute("form", form);

        return "formatter-form";
    }

    @PostMapping("/formatter/edit")
    public String formatterEdit(@ModelAttribute Form form) {
        return "formatter-view";
    }

    @Data
    static class Form {

        @NumberFormat(pattern = "###,###")
        private Integer number;

        @DateTimeFormat(pattern = "yyyy-MM-dd HH:mm:ss")
        private LocalDateTime localDateTime;
    }
}
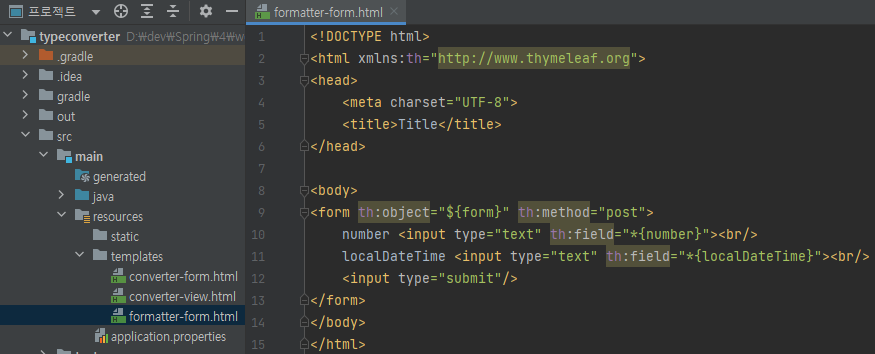
formatter-form.html
<!DOCTYPE html>
<html xmlns:th="http://www.thymeleaf.org">
<head>
    <meta charset="UTF-8">
    <title>Title</title>
</head>

<body>
<form th:object="${form}" th:method="post">
    number <input type="text" th:field="*{number}"><br/>
    localDateTime <input type="text" th:field="*{localDateTime}"><br/>
    <input type="submit"/>
</form>
</body>
</html>
main/resources/templates/formatter-form.html 생성
formatter-view.html
<!DOCTYPE html>
<html xmlns:th="http://www.thymeleaf.org">
<head>
    <meta charset="UTF-8">
    <title>Title</title>
</head>

<body>
<ul>
    <li>${form.number}: <span th:text="${form.number}" ></span></li>
    <li>${{form.number}}: <span th:text="${{form.number}}" ></span></li>
    <li>${form.localDateTime}: <span th:text="${form.localDateTime}" ></span></li>
    <li>${{form.localDateTime}}: <span th:text="${{form.localDateTime}}" ></span></li>
</ul>
</body>
</html>
main/resources/templates/formatter-view.html 생성
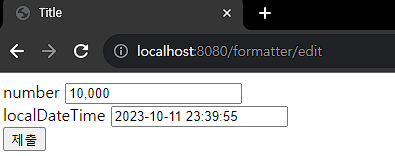
실행

실행 - 제출 버튼

참고
@NumberFormat, @DateTimeFormat의 자세한 사용법이 궁금한 분들은 다음 링크를 참고하거나 관련 애노테이션을 검색해 보자.
https://docs.spring.io/spring-framework/docs/current/reference/html/core.html#formatCustomFormatAnnotations정리
컨버터를 사용하든, 포맷터를 사용하든 등록 방법은 다르지만, 사용할 때는 컨버전 서비스를 통해서 일관성 있게 사용할 수 있다.
주의!
메시지 컨버터(HttpMessageConverter)에는 컨버전 서비스가 적용되지 않는다.
특히 객체를 JSON으로 변환할 때 메시지 컨버터를 사용하면서 이 부분을 많이 오해하는데, HttpMessageConverter의 역할은 HTTP 메시지 바디의 내용을 객체로 변환하거나 객체를 HTTP 메시지 바디에 입력하는 것이다. 예를 들어서 JSON을 객체로 변환하는 메시지 컨버터는 내부에서 Jackson 같은 라이브러리를 사용한다. 객체를 JSON으로 변환한다면 그 결과는 이 라이브러리에 달린 것이다. 따라서 JSON 결과로 만들어지는 숫자나 날짜 포맷을 변경하고 싶으면 해당 라이브러리가 제공하는 설정을 통해서 포맷을 지정해야 한다. 결과적으로 이것은 컨버전 서비스와 전혀 관계가 없다.
컨버전 서비스는 @RequestParam, @ModelAttribute, @PathVariable, 뷰 템플릿 등에서 사용할 수 있다.
출처 : https://www.inflearn.com/course/%EC%8A%A4%ED%94%84%EB%A7%81-mvc-2
스프링 MVC 2편 - 백엔드 웹 개발 활용 기술 - 인프런 | 강의
웹 애플리케이션 개발에 필요한 모든 웹 기술을 기초부터 이해하고, 완성할 수 있습니다. MVC 2편에서는 MVC 1편의 핵심 원리와 구조 위에 실무 웹 개발에 필요한 모든 활용 기술들을 학습할 수 있
www.inflearn.com
'Spring > 스프링 MVC 2편 - 백엔드 웹 개발 활용 기술' 카테고리의 다른 글
[김영한 스프링] 56. 파일 업로드 - 서블릿과 파일 업로드 & 스프링과 파일 업로드 (0) 2023.10.12 [김영한 스프링] 55. 파일 업로드 - 소개 & 프로젝트 생성 & 세팅 (1) 2023.10.12 [김영한 스프링] 53. 스프링 타입 컨버터 - 포맷터(Formatter) & 포맷터를 지원하는 컨버전 서비스 (0) 2023.10.11 [김영한 스프링] 52. 스프링 타입 컨버터 - 스프링에 Converter 적용하기 & 뷰 템플릿에 컨버터 적용하기 (1) 2023.10.11 [김영한 스프링] 51. 스프링 타입 컨버터 - 타입 컨버터(Converter) & 컨버전 서비스(ConversionService) (1) 2023.10.10