[김영한 스프링] 17. 메시지, 국제화 - 웹 애플리케이션에 메시지, 국제화 적용하기
웹 애플리케이션에 메시지 적용하기
messages.properties
label.item=상품
label.item.id=상품 ID
label.item.itemName=상품명
label.item.price=가격
label.item.quantity=수량

page.items=상품 목록
page.item=상품 상세
page.addItem=상품 등록
page.updateItem=상품 수정

button.save=저장
button.cancel=취소
타임리프 메시지 적용
타임리프의 메시지 표현식 #{...}를 사용하면 스프링의 메시지를 편리하게 조회할 수 있다.
예를 들어서 방금 등록한 상품이라는 이름을 조회하려면 #{label.item}이라고 하면 된다.
렌더링 전
<div th:text="#{label.item}"></h2>
렌더링 후
<div>상품</h2>
addForm.html
    <div class="py-5 text-center">
        <h2 th:text="#{page.addItem}">상품 등록 폼</h2>
    </div>

    <form action="item.html" th:action th:object="${item}" method="post">
        <div>
            <label for="itemName" th:text="#{label.item.itemName}">상품명</label>
            <input type="text" id="itemName" th:field="*{itemName}" class="form-control" placeholder="이름을 입력하세요">
        </div>
        <div>
            <label for="price" th:text="${label.item.price}">가격</label>
            <input type="text" id="price" th:field="*{price}" class="form-control" placeholder="가격을 입력하세요">
        </div>
        <div>
            <label for="quantity" th:text="${label.item.quantity}">수량</label>
            <input type="text" id="quantity" th:field="*{quantity}" class="form-control" placeholder="수량을 입력하세요">
        </div>

        <hr class="my-4">

        <div class="row">
            <div class="col">
                <button class="w-100 btn btn-primary btn-lg" type="submit" th:text="${button.save}">저장</button>
            </div>
            <div class="col">
                <button class="w-100 btn btn-secondary btn-lg"
                        onclick="location.href='items.html'"
                        th:onclick="|location.href='@{/message/items}'|"
                        type="button" th:text="${button.cancel}">취소</button>
            </div>
        </div>

    </form>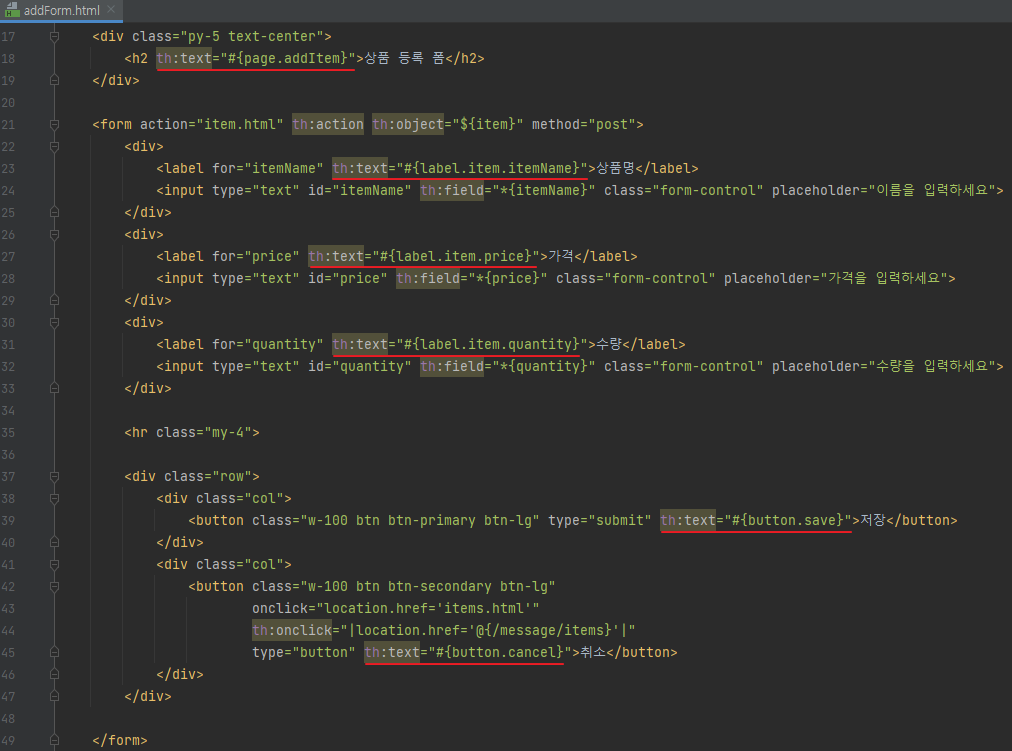
페이지 이름에 적용
- <h2>상품 등록 폼</h2>
- <h2 th:text="#{page.addItem}">상품 등록</h2>
레이블에 적용
- <label for="itemName">상품명</label>
- <label for="itemName" th:text="#{label.item.itemName}">상품명</label>
- <label for="price" th:text="#{label.item.price}">가격</label>
- <label for="quantity" th:text="#{label.item.quantity}">수량</label>
버튼에 적용
- <button type="submit">상품 등록</button>
- <button type="submit" th:text="#{button.save}">저장</button>
- <button type="button" th:text="#{button.cancel}">취소</button>
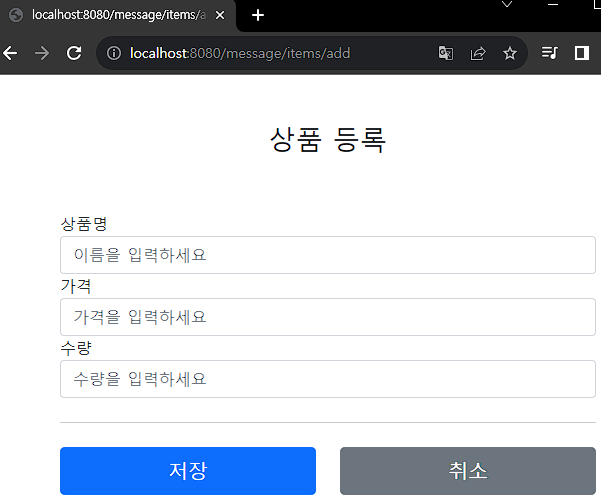
실행
editForm.html
    <div class="py-5 text-center">
        <h2 th:text="#{page.updateItem}">상품 수정 폼</h2>
    </div>

    <form action="item.html" th:action th:object="${item}" method="post">
        <div>
            <label for="id" th:text="#{label.item.id}">상품 ID</label>
            <input type="text" id="id" th:field="*{id}" class="form-control" readonly>
        </div>
        <div>
            <label for="itemName" th:text="#{label.item.price}">상품명</label>
            <input type="text" id="itemName" th:field="*{itemName}" class="form-control">
        </div>
        <div>
            <label for="price" th:text="#{label.item.price}">가격</label>
            <input type="text" id="price" th:field="*{price}" class="form-control">
        </div>
        <div>
            <label for="quantity" th:text="#{label.item.quantity}">수량</label>
            <input type="text" id="quantity" th:field="*{quantity}" class="form-control">
        </div>

        <hr class="my-4">

        <div class="row">
            <div class="col">
                <button class="w-100 btn btn-primary btn-lg" type="submit" th:text="#{button.save}">저장</button>
            </div>
            <div class="col">
                <button class="w-100 btn btn-secondary btn-lg"
                        onclick="location.href='item.html'"
                        th:onclick="|location.href='@{/message/items/{itemId}(itemId=${item.id})}'|"
                        type="button" th:text="#{button.cancel}">취소</button>
            </div>
        </div>

    </form>
item.html
    <div class="py-5 text-center">
        <h2 th:text="#{page.item}">상품 상세</h2>
    </div>

    <!-- 추가 -->
    <h2 th:if="${param.status}" th:text="'저장 완료'"></h2>

    <div>
        <label for="itemId" th:text="#{label.item.id}">상품 ID</label>
        <input type="text" id="itemId" name="itemId" class="form-control" value="1" th:value="${item.id}" readonly>
    </div>
    <div>
        <label for="itemName" th:text="#{label.item.itemName}">상품명</label>
        <input type="text" id="itemName" name="itemName" class="form-control" value="상품A" th:value="${item.itemName}" readonly>
    </div>
    <div>
        <label for="price" th:text="#{label.item.price}">가격</label>
        <input type="text" id="price" name="price" class="form-control" value="10000" th:value="${item.price}" readonly>
    </div>
    <div>
        <label for="quantity" th:text="#{label.item.quantity}">수량</label>
        <input type="text" id="quantity" name="quantity" class="form-control" value="10" th:value="${item.quantity}" readonly>
    </div>

    <hr class="my-4">

    <div class="row">
        <div class="col">
            <button class="w-100 btn btn-primary btn-lg"
                    onclick="location.href='editForm.html'"
                    th:onclick="|location.href='@{/message/items/{itemId}/edit(itemId=${item.id})}'|"
                    type="button" th:text="#{page.updateItem}">상품 수정</button>
        </div>
        <div class="col">
            <button class="w-100 btn btn-secondary btn-lg"
                    onclick="location.href='items.html'"
                    th:onclick="|location.href='@{/message/items}'|"
                    type="button" th:text="#{page.items}">목록으로</button>
        </div>
    </div>
items.html
<div class="container" style="max-width: 600px">
    <div class="py-5 text-center">
        <h2 th:text="#{page.items}">상품 목록</h2>
    </div>

    <div class="row">
        <div class="col">
            <button class="btn btn-primary float-end"
                    onclick="location.href='addForm.html'"
                    th:onclick="|location.href='@{/message/items/add}'|"
                    type="button" th:text="#{page.addItem}">상품 등록</button>
        </div>
    </div>

    <hr class="my-4">
    <div>
        <table class="table">
            <thead>
            <tr>
                <th th:text="#{label.item.id}">ID</th>
                <th th:text="#{label.item.itemName}">상품명</th>
                <th th:text="#{label.item.price}">가격</th>
                <th th:text="#{label.item.quantity}">수량</th>
            </tr>
            </thead>
            <tbody>
            <tr th:each="item : ${items}">
                <td><a href="item.html" th:href="@{/message/items/{itemId}(itemId=${item.id})}" th:text="${item.id}">회원id</a></td>
                <td><a href="item.html" th:href="@{|/message/items/${item.id}|}" th:text="${item.itemName}">상품명</a></td>
                <td th:text="${item.price}">10000</td>
                <td th:text="${item.quantity}">10</td>
            </tr>
            </tbody>
        </table>
    </div>

</div> <!-- /container -->
참고
파라미터는 다음과 같이 사용할 수 있다.
hello.name=안녕 {0}
<p th:text="#{hello.name(${item.itemName})}"></p>
웹 애플리케이션에 국제화 적용하기
웹 애플리케이션에 국제화를 적용해 보자. 먼저 영어 메시지를 추가하자.
messages_en.properties
label.item=Item
label.item.id=Item ID
label.item.itemName=Item Name
label.item.price=price
label.item.quantity=quantity
page.items=Item List
page.item=Item Detail
page.addItem=Item Add
page.updateItem=Item Update
button.save=Save
button.cancel=Cancel

사실 이것으로 국제화 작업은 거의 끝났다. 앞에서 템플릿 파일에는 모두 #{...}를 통해서 메시지를 사용하도록 적용해 두었기 때문이다.
웹으로 확인하기

웹 브라우저의 언어 설정 값을 변경하면서 국제화 적용을 확인해 보자.
크롬 브라우저 -> 설정 -> 언어를 검색하고, 우선순위를 변경하면 된다.

웹 브라우저의 언어 설정 값을 변경하면 요청 시 Accept-Language의 값이 변경된다.
Accept-Language는 클라이언트가 서버에 기대하는 언어 정보를 담아서 요청하는 HTTP 요청 헤더이다.
(더 자세한 내용은 모든 개발자를 위한 HTTP 웹 기본지식 강의를 참고하자.)
스프링의 국제화 메시지 선택
앞서 MessageSource 테스트에서 보았듯이 메시지 기능은 Locale 정보를 알아야 언어를 선택할 수 있다.
결국 스프링도 Locale 정보를 알아야 언어를 선택할 수 있는데, 스프링은 언어 선택 시 기본으로 AcceptLanguage 헤더의 값을 사용한다.
LocaleResolver
스프링은 Locale 선택 방식을 변경할 수 있도록 LocaleResolver라는 인터페이스를 제공하는데, 스프링 부트는 기본으로 Accept-Language를 활용하는 AcceptHeaderLocaleResolver를 사용한다.
LocaleResolver 인터페이스

LocaleResolver 변경
만약 Locale 선택 방식을 변경하려면 LocaleResolver의 구현체를 변경해서 쿠키나 세션 기반의 Locale 선택 기능을 사용할 수 있다. 예를 들어서 고객이 직접 Locale을 선택하도록 하는 것이다. 관련해서 LocaleResolver를 검색하면 수 많은 예제가 나오니 필요한 분들은 참고하자.
출처 : https://www.inflearn.com/course/%EC%8A%A4%ED%94%84%EB%A7%81-mvc-2
스프링 MVC 2편 - 백엔드 웹 개발 활용 기술 - 인프런 | 강의
웹 애플리케이션 개발에 필요한 모든 웹 기술을 기초부터 이해하고, 완성할 수 있습니다. MVC 2편에서는 MVC 1편의 핵심 원리와 구조 위에 실무 웹 개발에 필요한 모든 활용 기술들을 학습할 수 있
www.inflearn.com